
Chevrolet Spark Owners Manual: Tire Sealant and Compressor Kit
Warning
Idling a vehicle in an enclosed area with poor ventilation is dangerous. Engine exhaust may enter the vehicle. Engine exhaust contains carbon monoxide (CO) which cannot be seen or smelled.
It can cause unconsciousness and even death. Never run the engine in an enclosed area that has no fresh air ventilation. For more information, see Engine Exhaust on page 9-20.
Warning
Overinflating a tire could cause the tire to rupture and you or others could be injured. Be sure to read and follow the tire sealant and compressor kit instructions and inflate the tire to its recommended pressure. Do not exceed the recommended pressure.
Warning
Storing the tire sealant and compressor kit or other equipment in the passenger compartment of the vehicle could cause injury. In a sudden stop or collision, loose equipment could strike someone. Store the tire sealant and compressor kit in its original location.
If this vehicle has a tire sealant and compressor kit, there may not be a spare tire or tire changing equipment, and on some vehicles there may not be a place to store a tire.
The tire sealant and compressor can be used to temporarily seal punctures up to 6 mm (0.25 in) in the tread area of the tire. It can also be used to inflate an underinflated tire.
If the tire has been separated from the wheel, has damaged sidewalls, or has a large puncture, the tire is too severely damaged for the tire sealant and compressor kit to be effective. See Roadside Assistance Program on page 13-5.
Read and follow all of the tire sealant and compressor kit instructions.
The kit includes: 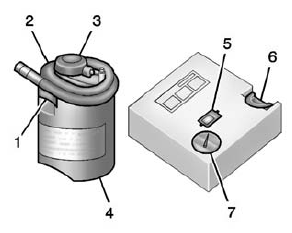
- Sealant Canister Inlet Valve
- Sealant/Air Hose
- Base of Sealant Canister
- Tire Sealant Canister
- On/Off Button
- Slot on Top of Compressor
- Pressure Gauge
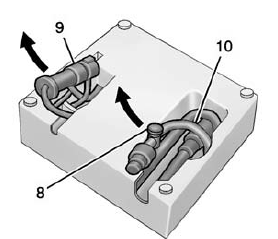
- Pressure Deflation Button
- Power Plug
- Air Only Hose
- Tire Sealant
- Using the Tire Sealant and Compressor Kit to Temporarily Seal and Inflate a Punctured Tire
- Using the Tire Sealant and Compressor Kit without Sealant to Inflate a Tire (Not Punctured)
 If a Tire Goes Flat
This vehicle has a tire sealant and compressor kit. See Tire Sealant and Compressor
Kit on page 10-56.
There is no spare tire, no tire changing equipment, and no place to store a tire.
It is unusu ...
 Tire Sealant
Read and follow the safe handling instructions on the label adhered to the tire
sealant canister (4).
Check the tire sealant expiration date on the tire sealant canister.
The tire sealant canister ...
Other materials:
Vehicle Data
Capacities and Specifications
The following approximate capacities are given in metric and English conversions.
See Recommended Fluids and Lubricants on page 11-12 for more information.
Engine Drive Belt Routing
...
Radio(s)
/VOL: Press to turn the system on
and off. Turn to increase or decrease the volume.
RADIO/BAND: Press to select AM, FM, or band.
SEEK or SEEK
: Press to seek the previous or next station.
Buttons 1-6: Press to save and select favorite stations.
INFO: Press to view current radio ...
Smartphone Link (Stitcher)
Some images and explanations may vary by phone operating systems, versions, and/or
application (App) versions.
Using Stitcher
Install the Stitcher application on the smartphone.
Connect the smartphone to the infotainment system through the USB port or
Bluetooth wireless technology.
...
