Chevrolet Spark Owners Manual: Using the Tire Sealant and Compressor Kit without Sealant to Inflate a Tire (Not Punctured)
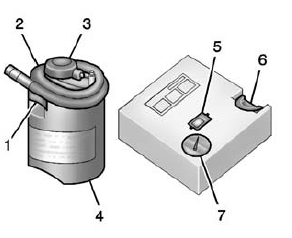
The kit includes: 
- Sealant Canister Inlet Valve
- Sealant/Air Hose
- Base of Sealant Canister
- Tire Sealant Canister
- On/Off Button
- Slot on Top of Compressor
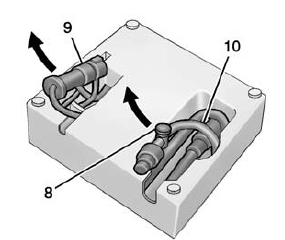
- Pressure Gauge

- Pressure Deflation Button
- Power Plug
- Air Only Hose
If a tire goes flat, avoid further tire and wheel damage by driving slowly to a level place. Turn on the hazard warning flashers. See Hazard Warning Flashers on page 6-3.
See If a Tire Goes Flat on page 10-55 for other important safety warnings.
- Remove the compressor from its storage location. See Storing the Tire Sealant and Compressor Kit on page 10-63.
- Remove the air only hose (10) and the power plug (9) from the bottom of the compressor
- Place the compressor on the ground near the flat tire.
Make sure the tire valve stem is positioned close to the ground so the hose will reach it.
- Remove the valve stem cap from the flat tire by turning it counterclockwise.
- Attach the air only hose (10) to the tire valve stem by turning it clockwise until tight.
- Plug the power plug (9) into the accessory power outlet in the vehicle.
Unplug all items from other accessory power outlets.
See Power Outlets on page 5-6.If the vehicle has an accessory power outlet, do not use the cigarette lighter.
If the vehicle only has a cigarette lighter, use the cigarette lighter.
Do not pinch the power plug cord in the door or window.
- Start the vehicle. The vehicle must be running while using the air compressor.
- Press the on/off button (5) to turn the tire sealant and compressor kit
on.
The compressor will inflate the tire with air only.
- Inflate the tire to the recommended inflation pressure using the pressure
gauge (7).
The recommended inflation pressure can be found on the Tire and Loading Information label. See Tire Pressure on page 10-43.
The pressure gauge (7) may read higher than the actual tire pressure while the compressor is on. Turn the compressor off to get an accurate pressure reading. The compressor may be turned on/off until the correct pressure is reached.
If the tire is inflated higher than the recommended pressure, adjust the excess pressure by pressing the pressure deflation button (8) until the proper pressure reading is reached.
This option is only functional when using the air only hose (10).
Caution
If the recommended pressure cannot be reached after approximately 25 minutes, the vehicle should not be driven farther. The tire is too severely damaged and the tire sealant and compressor kit cannot inflate the tire. Remove the power plug from the accessory power outlet and unscrew the inflating hose from the tire valve. See Roadside Assistance Program on page 13-5.
- Press the on/off button (5) to turn the tire sealant and compressor kit
off.
Be careful while handling the compressor as it could be warm after usage.
- Unplug the power plug (9) from the accessory power outlet in the vehicle.
- Turn the air only hose (10) counterclockwise to remove it from the tire valve stem.
- Replace the tire valve stem cap.
- Return the air only hose (10) and power plug (9) back to their original storage location.
- Return the equipment to its original storage location in the vehicle.
The tire sealant and compressor kit has accessory adapters located in a compartment on the bottom of its housing that can be used to inflate air mattresses, balls, etc.
 Using the Tire Sealant and Compressor Kit to Temporarily Seal and Inflate a
Punctured Tire
When using the tire sealant and compressor kit during cold temperatures, warm
the kit in a heated environment for five minutes.
This will help to inflate the tire faster.
If a tire goes flat, avoi ...
 Storing the Tire Sealant and Compressor Kit
The tire sealant and compressor kit is located in the rear storage area.
Lift the trim cover.
Remove the tire sealant canister (1) and the compressor (2).
To store the tire sealant an ...
Other materials:
Automatic Transmission
Continuously Variable Transmission (CVT)
The CVT is electronically controlled to produce maximum power and smooth operation.
A display in the instrument cluster indicates the selected range.
P (Park): This position locks the front wheels. Select P (Park) only when the
vehicle is stationary ...
Electrical System Overload
The vehicle has fuses and circuit breakers to protect against an electrical system
overload.
When the current electrical load is too heavy, the circuit breaker opens and
closes, protecting the circuit until the current load returns to normal or the problem
is fixed. This greatly reduces the c ...
Checking Coolant
The vehicle must be on a level surface when checking the coolant level.
It is normal to see coolant moving in the upper coolant hose return line when
the engine is running.
Check to see if coolant is visible in the coolant surge tank. If the coolant
inside the coolant surge tank is boiling, do ...
