Chevrolet Spark Owners Manual: Tire Rotation
Tires should be rotated every 12 000 km (7,500 mi). The first rotation is the most important.
See Maintenance Schedule on page 11-3.
Tires are rotated to achieve a more uniform wear for all tires.
Anytime unusual wear is noticed, rotate the tires as soon as possible, check for proper tire inflation pressure, and check for damaged tires or wheels. If the unusual wear continues after the rotation, check the wheel alignment. See When It Is Time for New Tires on page 10-49 and Wheel Replacement on page 10-54.
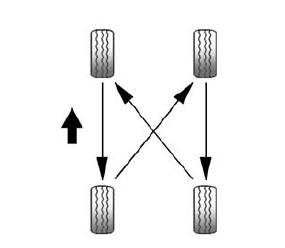
Use this rotation pattern when rotating the tires.
Adjust the front and rear tires to the recommended inflation pressure on the Tire and Loading Information label after the tires have been rotated. See Tire Pressure on page 10-43 and Vehicle Load Limits on page 9-9.
Reset the Tire Pressure Monitor System. See Tire Pressure Monitor Operation on page 10-45.
Check that all wheel nuts are properly tightened. See “Wheel Nut Torque” under Capacities and Specifications on page 12-2.
Warning
Rust or dirt on a wheel, or on the parts to which it is fastened, can make wheel nuts become loose after a time. The wheel could come off and cause a crash. When changing a wheel, remove any rust or dirt from places where the wheel attaches to the vehicle. In an emergency, a cloth or a paper towel can be used, however, use a scraper or wire brush to remove all rust or dirt.
Lightly coat the center of the wheel hub with wheel bearing grease after a wheel change or tire rotation to prevent corrosion or rust build-up. Do not get grease on the flat wheel mounting surface or on the wheel nuts or bolts.
 Tire Inspection
We recommend that the tires, including the spare tire, if the vehicle has one,
be inspected for signs of wear or damage at least once a month.
Replace the tire if:
The indicators at three or mo ...
 When It Is Time for New Tires
Factors such as maintenance, temperatures, driving speeds, vehicle loading, and
road conditions affect the wear rate of the tires.
Treadwear indicators are one way to tell when it is time for n ...
Other materials:
Air Vents
Adjustable air vents are in the center and on the side of the instrument panel.
Move the slats to change the direction of the airflow. The center air vent does
not close completely.
Press the cover of the side air vents to open. Turn open slats clockwise or counterclockwise
to direct a ...
Service Vehicle Soon Light
For vehicles with this light, it
comes on if a condition exists that may require the vehicle to be taken in for service.
If the light comes on, take the vehicle to your dealer for service as soon as
possible.
Owner Manual Indicator
This symbol is shown when you need
to see the owner manual ...
GM Mobility Reimbursement Program
This program is available to qualified
applicants for cost reimbursement of eligible aftermarket adaptive equipment required
for the vehicle, such as hand controls or a wheelchair/ scooter lift for the vehicle.
For more information on the limited offer, visit www.gmmobility.com or call the
G ...
