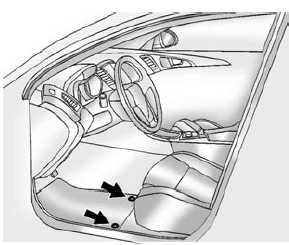
Chevrolet Spark Owners Manual: Floor Mats
Warning
If a floor mat is the wrong size or is not properly installed, it can interfere with the pedals.
Interference with the pedals can cause unintended acceleration and/or increased stopping distance which can cause a crash and injury. Make sure the floor mat does not interfere with the pedals.
Use the following guidelines for proper floor mat usage:
- The original equipment floor mats were designed for your vehicle. If the floor mats need replacing, it is recommended that GM certified floor mats be purchased. Non-GM floor mats may not fit properly and may interfere with the pedals. Always check that the floor mats do not interfere with the pedals.
- Do not use a floor mat if the vehicle is not equipped with a floor mat retainer on the driver side floor.
- Use the floor mat with the correct side up. Do not turn it over.
- Do not place anything on top of the driver side floor mat.
- Use only a single floor mat on the driver side.
- Do not place one floor mat on top of another.
Removing and Replacing the Floor Mats
Pull up on the rear of the floor mat to unlock each retainer and remove.
Reinstall by lining up the floor mat retainer openings over the carpet retainers and snap into position.
Make sure the floor mat is properly secured in place.
Verify the floor mat does not interfere with the pedals.
 Instrument Panel, Leather, Vinyl, Other Plastic Surfaces, Low Gloss Paint Surfaces
and Natural Open Pore Wood Surfaces
Instrument Panel, Leather, Vinyl, Other Plastic Surfaces, Low Gloss Paint Surfaces
and Natural Open Pore Wood Surfaces
Use a soft microfiber cloth dampened with water to remove dust and loose dirt.
For a more thorough cleaning, use a soft microfiber cloth dampened with a mild soap
solution.
Caution
Soaking or sa ...

Other materials:
Exterior Lighting
The exterior lamp control is on the turn signal lever on the left side of the
steering column.
There are four positions:
Turns on the headlamps together with
the parking lamps and instrument panel lights.
Turns on the parking lamps including
all lamps, except the headlamps.
Turns the ...
Automatic Headlamp System
When it is dark enough outside and the exterior lamp control is in the automatic
position, the headlamps come on automatically. See Exterior Lamp Controls on page
6-1.
The vehicle has a light sensor on top of the instrument panel. Make sure it is
not covered, or the headlamps will be on w ...
Pictures and Movies (Movie System)
The infotainment system can play movie files stored on a USB storage device and
devices that support Media Transfer Protocol (MTP).
Movie System Information
Caution for Using Movie Files
Available resolution: Within 720 x 576 (W x H) pixels.
Frame rate: Less than 30 fps.
Playable movie f ...
