Chevrolet Spark Owners Manual: Securing a Child Restraint Designed for the LATCH System
Warning
If a LATCH-type child restraint is not attached to anchors or with the safety belt, the child restraint will not be able to protect the child correctly. In a crash, the child could be seriously injured or killed. Install a LATCH-type child restraint properly using the anchors, or use the vehicle safety belts to secure the restraint, following the instructions that came with the child restraint and the instructions in this manual.
Warning
To reduce the risk of serious or fatal injuries during a crash, do not attach more than one child restraint to a single anchor.
Attaching more than one child restraint to a single anchor could cause the anchor or attachment to come loose or even break during a crash. A child or others could be injured.
Warning
Children can be seriously injured or strangled if a shoulder belt is wrapped around their neck. The shoulder belt can tighten but cannot be loosened if it is locked.
The shoulder belt locks when it is pulled all the way out of the retractor. It unlocks when the shoulder belt is allowed to go all the way back into the retractor, but it cannot do this if it is wrapped around a child’s neck.
If the shoulder belt is locked and tightened around a child’s neck, the only way to loosen the belt is to cut it.
Buckle any unused safety belts behind the child restraint so children cannot reach them. Pull the shoulder belt all the way out of the retractor to set the lock, and tighten the belt behind the child restraint after the child restraint has been installed.
Caution
Do not let the LATCH attachments rub against the vehicle’s safety belts. This may damage these parts. If necessary, move buckled safety belts to avoid rubbing the LATCH attachments.
Do not fold the empty rear seat with a safety belt buckled. This could damage the safety belt or the seat. Unbuckle and return the safety belt to its stowed position, before folding the seat.
If you need to secure more than one child restraint in the rear seat, see Where to Put the Restraint on page 3-38.
This system is designed to make installation of child restraints easier.
When using lower anchors, do not use the vehicle's safety belts.
Instead use the vehicle's anchors and child restraint attachments to secure the restraints. Some restraints also use another vehicle anchor to secure a top tether.
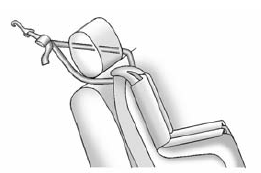
- Attach and tighten the lower attachments to the lower anchors. If the child restraint does not have lower attachments or the desired seating position does not have lower anchors, secure the child restraint with the top tether and the safety belts. Refer to your child restraint manufacturer instructions and the instructions in this manual.
1.1. Find the lower anchors for the desired seating position.
1.2. Put the child restraint on the seat.
For rear outboard seating positions, if the head restraint interferes with the proper installation of the child restraint, the head restraint may be removed.
See “Head Restraint Removal and Reinstallation” at the end of this section.
When installing a rear-facing child restraint, it may be necessary to move the front seat forward to properly install the child restraint per the child restraint manufacturer instructions. See Seat Adjustment on page 3-5.
1.3. Attach and tighten the lower attachments on the child restraint to the lower anchors.
- If the child restraint manufacturer recommends that the top tether be attached, attach and tighten the top tether to the top tether anchor, if equipped. Refer to the child restraint instructions and the following steps:
2.1. Find the top tether anchor.
2.2. Remove the cargo cover before installing the top tether. Place the cargo cover on the floor of the cargo area. The cargo cover should remain off while the top tether is in use.
2.3. Route, attach, and tighten the top tether according to your child restraint instructions and the following instructions:
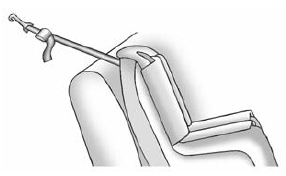 If you are using a single tether
in an outboard seating position and the head restraint has been removed, route the
tether over the seatback.
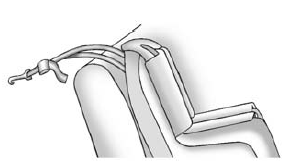 If you are using a dual tether in
an outboard seating position and the head restraint has been removed, route the
tether over the seatback and over the inboard edge of the rear speaker.
 If the rear outboard seating position
you are using has an adjustable head restraint and you are using a single tether,
raise the head restraint and route the tether under the head restraint and in between
the head restraint posts.
 If the rear outboard seating position
you are using has an adjustable head restraint and you are using a dual tether,
raise the head restraint and route the tether under the head restraint and around
the head restraint posts.
- Before placing a child in the child restraint, make sure it is securely held in place. To check, grasp the child restraint at the LATCH path and attempt to move it side to side and back and forth. There should be no more than 2.5 cm (1 in) of movement for proper installation.
 Lower Anchor and Top Tether Anchor Locations
(Top Tether Anchor): Seating positions
with top tether anchors.
(Lower Anchor): Seating positions
with two lower anchors.
To assist in locating the lower
anchors, each seating position w ...
 Head Restraint Removal and Reinstallation
The rear outboard head restraints can be removed if they interfere with the proper
installation of the child restraint.
To remove the head restraint:
Partially fold the seatback forward. See Re ...
Other materials:
Windows
Warning
Never leave a child, a helpless adult, or a pet alone in a vehicle,
especially with the windows closed in warm or hot weather.
They can be overcome by the extreme heat and suffer permanent injuries or even
death from heat stroke.
The vehicle aerodynamics are designed to improve fu ...
Cruise Control Light
For vehicles with cruise control,
the cruise control light is white when the cruise control is on and ready, and turns
green when the cruise control is set and active.
The light turns off when the cruise control is turned off. See Cruise Control
on page 9-30.
Door Ajar Light
This light come ...
Traction Control/Electronic Stability Control
The TCS limits wheel spin. The system is on when the vehicle is started.
The StabiliTrak system assists with directional control of the vehicle in difficult
driving conditions. The system is on when the vehicle is started.
To turn off traction control, press and release the TCS/StabiliTrak bu ...
