
Chevrolet Spark Owners Manual: Passenger Compartment Air Filter
The filter reduces the dust, pollen, and other airborne irritants from outside air that is pulled into the vehicle.
The filter should be replaced as part of routine scheduled maintenance. See Maintenance Schedule on page 11-3. To find out what type of filter to use, see Maintenance Replacement Parts on page 11-13.

- Open the glove box completely and pull it up by each side to remove.
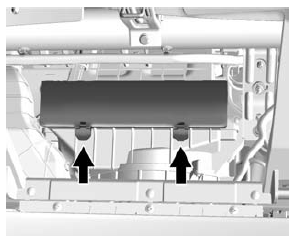
- Push the two tabs upward and release the latches holding the service door. Lift the service door.
- Remove the old air filter.
- Install the new air filter.
- Close the service door and latches.
- Reinstall the glove box.
See your dealer if additional assistance is needed.
 Air Intake
The air intake at the base of the windshield under the hood must be kept clear
to allow the flow of air into the vehicle. Clear away any ice, snow, or leaves. ...

Other materials:
Lower Anchors and Tethers for Children (LATCH System)
The LATCH system secures a child restraint during driving or in a crash.
LATCH attachments on the child restraint are used to attach the child restraint
to the anchors in the vehicle. The LATCH system is designed to make installation
of a child restraint easier.
In order to use the LATCH syste ...
Front Turn Signal/Parking Lamps
To replace a front turn signal bulb:
Open the hood. See Hood on page 10-5.
Turn the bulb socket counterclockwise and pull it out of the lamp housing.
Pull the bulb straight out of the bulb socket.
Install the new bulb into the socket by pressing it in.
Install the socket into the ...
OnStar Additional Information
Transferring Service
Press to request account transfer
eligibility information. The Advisor can assist in canceling or removing account
information.
Selling/Transferring the Vehicle
Call 1-888-4-ONSTAR immediately to terminate your OnStar services if the vehicle
is disposed of, sold, trans ...
